These 4-Ingredient Butter Cookies Are So Easy, People Don’t Believe You Made Them at Home
In the world of baking, there is a common myth that complexity equals quality. However, the 4-Ingredient Butter Cookie (also known as the “Danish Shortbread”) is the definitive proof that you only need a few high-quality staples to create a professional, melt-in-your-mouth experience.
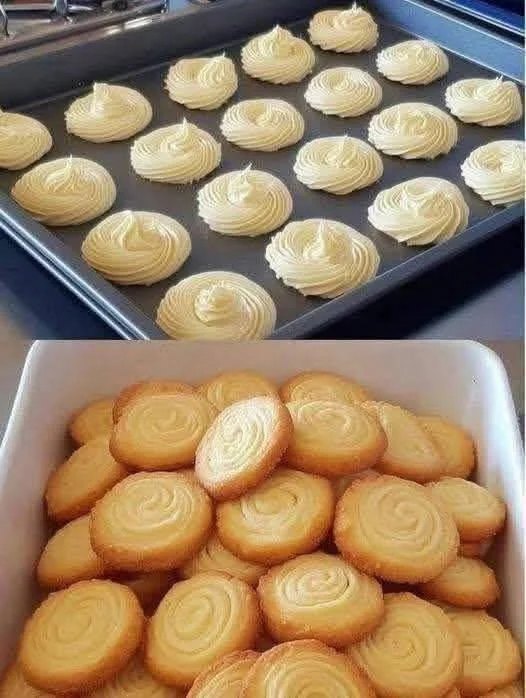
These cookies are famous for their “sandy” texture and rich, buttery finish. They are so remarkably consistent that they often look like they came from a high-end tin rather than a home oven.
The “Golden Ratio” of Baking
The success of this recipe relies on the 1:2:3 ratio (by weight), a classic pastry school secret. This balance ensures the cookie is sturdy enough to hold its shape but delicate enough to crumble the moment it hits your tongue.
- Sugar: For sweetness and structure.
- Butter: For flavor and that “melt” factor.
- Flour: To provide the framework.
- The Secret 4th: Pure Vanilla Extract (the “aroma” that makes people think you’re a pro).
Recipe: The “Impossible” 4-Ingredient Butter Cookies
Ingredients
- 1 cup (225g) Unsalted Butter (Must be high-quality and softened to room temperature).
- 1/2 cup (100g) Granulated Sugar (or Powdered Sugar for a “meltier” texture).
- 2 cups (250g) All-Purpose Flour.
- 1 tsp Pure Vanilla Extract.
Step-by-Step Instructions
1. The “Creaming” Phase
In a large bowl, beat the softened butter and sugar together until the mixture is pale, fluffy, and looks like whipped cream (about 3–5 minutes). Do not rush this; the air you beat in here is the only “leavening” the cookie has.
2. The Flavor & Flour
Add the vanilla extract and mix briefly. Slowly fold in the flour. Stop mixing the moment the white streaks disappear. If you overwork the dough, the cookies will be tough rather than tender.
3. The “Chill” (Non-Negotiable)
Shape the dough into a log (about 2 inches in diameter), wrap it in plastic wrap, and refrigerate for at least 1 hour.
- Why? Chilling solidifies the butter. If you bake them while the dough is warm, they will spread into flat pancakes.
4. Slice and Bake
Preheat your oven to 350°F (175°C). Slice the chilled log into 1/2-inch thick rounds. Place them on a baking sheet lined with parchment paper. Bake for 10–12 minutes—just until the edges are barely golden. The centers should still look pale.
5. The Cooling Window
Let the cookies cool on the baking sheet for 5 minutes before moving them to a wire rack. They are very fragile while hot!
Comparison: Granulated vs. Powdered Sugar
| Sugar Type | Resulting Texture | Appearance |
| Granulated | Crisp, classic “snap,” slightly grainy. | Classic homemade look. |
| Powdered | “Melt-in-your-mouth,” ultra-delicate. | Perfectly smooth, professional finish. |
3 Tricks to Make Them “Unbelievable”
- The European Butter Upgrade: Since butter is the primary flavor, use a European-style butter (like Kerrygold) which has a higher fat content and less water than standard American butter.
- The Sugar Rim: Before slicing your dough log, roll it in coarse “sanding sugar” or sparkling sugar. This creates a glittering, crunchy edge that looks like it came from a French patisserie.
- The Salt Secret: Even though it’s not an “official” ingredient, a tiny pinch of sea salt on top of each cookie before baking will amplify the butter flavor tenfold.
Storage & Gifting
These cookies stay fresh in an airtight container for up to 2 weeks, making them the perfect “make-ahead” gift. In fact, the flavor often improves after 24 hours as the vanilla and butter notes deepen.
The Verdict: When your friends ask where you bought them, just smile. The simplicity of the ingredients is exactly why they taste so clean and decadent.