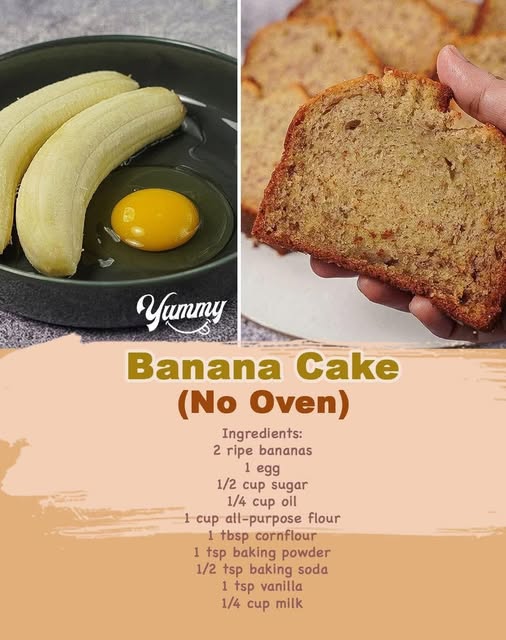
Banana Cake (No Oven) Recipe Ingredients
This No-Oven Banana Cake is a game-changer for anyone who wants a moist, bakery-style sponge without having to preheat a large oven. By using a stovetop steaming or skillet method, you trap moisture inside the cake, resulting in a texture that is far more tender and “bouncy” than traditional dry-heat baking.
It is the perfect way to use up those overripe bananas sitting on your counter, transforming them into a decadent dessert using just a standard frying pan or a pot.
Why the No-Oven Method Works
In an oven, dry air can sometimes crust the outside of a cake before the middle is cooked.1 On the stovetop, the heat is more direct from the bottom (like a pancake) or gentle (if using a lid). This “steaming effect” ensures the banana’s natural sugars caramelize slowly, keeping the crumb incredibly soft and “melt-in-your-mouth.”2+1
Recipe: Stovetop “Skillet” Banana Cake
Ingredients
- 2 Large Ripe Bananas (the spottier, the better!).
- 1 Large Egg.
- 1/2 cup Granulated Sugar.
- 1/4 cup Neutral Oil (Vegetable, Canola, or melted Coconut oil).3
- 1 cup All-Purpose Flour.
- 1 tbsp Cornflour (Cornstarch) — This is the secret to the “silky” crumb.
- 1 tsp Baking Powder.
- 1/2 tsp Baking Soda.
- 1 tsp Vanilla Extract (optional).
- Pinch of Salt.
Step-by-Step Instructions
1. The Banana Mash
In a medium bowl, peel and mash the bananas with a fork until they form a smooth paste. A few small lumps are fine, but for the best rise, aim for a consistent puree.
2. The Wet Base
Add the egg, sugar, and oil to the mashed bananas. Whisk vigorously for about 2 minutes. You want the sugar to mostly dissolve and the mixture to look slightly pale and aerated. Stir in the vanilla if using.
3. The Dry Mix
Sift in the all-purpose flour, cornflour, baking powder, baking soda, and salt.
The Golden Rule: Use a spatula to gently fold the dry ingredients into the wet. Stop as soon as you see no more white streaks of flour. Over-mixing will make the cake rubbery!
4. The “Stovetop” Setup
- The Pan: Grease a non-stick frying pan or a small pot with a little butter or oil.
- The Pour: Pour the batter into the pan and smooth the top.
- The Seal: Cover the pan with a tight-fitting lid. If the lid has a vent hole, plug it with a small piece of paper towel to trap the steam.
5. The Low-Heat Bake
Place the pan on your stove over the lowest possible heat setting.
- Cooking Time: Cook for 25–35 minutes.
- The Test: Insert a toothpick into the center; if it comes out clean, it’s done. The top should feel springy and dry to the touch.
Oven vs. Stovetop Comparison
| Feature | Stovetop (No-Oven) | Traditional Oven |
| Texture | Ultra-moist, pudding-like | Airy, light, with a crust |
| Color | Pale gold top, dark bottom | Evenly browned all over |
| Effort | Low (one pan) | Medium (multiple tools) |
| Heat Impact | Keeps the kitchen cool | Heats up the entire room |
3 Tricks for a Perfect No-Oven Cake
- The Heat Diffuser: If your stove runs hot even on “low,” place the frying pan on top of a flat tawa or another large flat pan. This creates “indirect heat” and prevents the bottom from burning before the top is set.
- The Caramelized Bottom: Sprinkle a little extra sugar on the greased pan before pouring the batter. This creates a thin, crunchy caramel layer on the bottom of the cake.
- The Cornflour Secret: Don’t skip the 1 tbsp of cornflour. It softens the proteins in the all-purpose flour, giving you a “cake flour” result that is much more delicate.
The Verdict: This is the most efficient way to get a cake fix. It’s dense, flavorful, and pairs perfectly with a cup of coffee or a drizzle of chocolate sauce.